Recently I had build my new home lab which has AMD processor.
Was having really tough time to configure Nutanix CE on AMD, but after lot of struggle I was able to install and configure my lab on AMD.
Step 0 – Registration
Register and download the Nutanix CE.
http://www.nutanix.com/products/community-edition/register/
https://portal.nutanix.com/#/page/docs/details?targetId=Nutanix-Community-Edition-Getting-Started:Nutanix-Community-Edition-Getting-Started
Step 1 – prepare the boot disk
Once you download the Nutanix CE package from the community page, it will download as a tar.gz file. Extract this file.
The file that is extracted will end in an .img extension. Rename this file to a .vmdk extension. For me this was around an 8GB file. This is the flat VMDK, so we need to add a descriptor VMDK file.
Create a descriptor file as below and save it as ce.vmdk.
Disk DescriptorFile
version=4
encoding="UTF-8"
CID=e5e783ce
parentCID=ffffffff
createType="vmfs"
Extent description
RW 14540800 VMFS "ce-flat.vmdk"
The Disk Data Base
DDB
ddb.adapterType = "lsilogic"
ddb.geometry.cylinders = "905"
ddb.geometry.heads = "255"
ddb.geometry.sectors = "63"
ddb.longContentID = "d25d878bcc1e973ba6b22eabe5e783ce"
ddb.uuid = "60 00 C2 9b 69 2f c9 76-74 c4 07 9e 10 87 3b f9"
ddb.virtualHWVersion = "15"
Step 2 – Prepare the VM:
CPU AMD CPUs, 4 vCPU minimum, with AMD-V/RVI support
Memory 16GB minimum
Hot Tier (SSD) One SSD per server minimum, ≥ 250GB per server
Cold Tier (HDD) One HDD per server minimum, ≥ 500GB per server
Networking Intel NIC

Step 3 – Installation
1. Start the VM ->press F2 to enter BIOS -> setup SATA disk as default boot disk
2. boot the server from SATA disk
3. Boot the AHV in rescue mode

Before you start installing AHV and CVM you need to edit 4 files sysUtil.py, default.xml, capabilities.xml minimum_reqs.py.
Login with user root and nutanix/4u as password.
1.Locate sysUtil.py file under directory /home/install/phx_iso/phoenix
Modify SSD IOPS values from 5000 to 4000/3000

2.Secondly edit the default.xml file which you will find it under below location: /home/install/phx_iso/phoenix/svm_template/kvm/default.xml
Edit the default.xml file and underneath the features section.

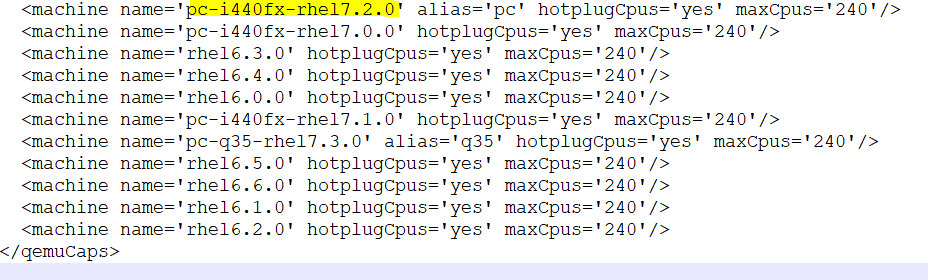
3. Locate the capabilities file which is located /var/cache/libvirt/qemu/capabilities/<number>.xml
Basically, in the qemu capabilities file, you are simply removing the existing pc-i440fx-rhel7.2.0 file and renaming the pc-i440fx-rhel7.3.0 to 7.2.0
4. You could disable the CheckVtx and CheckIsIntel checks in the /home/install/phx_iso/phoenix/minimum_reqs.py file

5. Start installation login as user “install”
Installation on AMD Processor completed without any issue.

You can refer below links for installation and configuration of Nutanix CE Cluster:
Install
Configure
Happy Prism..!! 🙂
