Previous vCF articles from the series:
1. Introduction to VMware Cloud Foundation 3.9.1 : Part1
2. VMware Cloud Foundation 3.9.0 Nested Deployment – Part 2: Lab Setup
3. VMware Cloud Foundation 3.9.0 Nested Deployment – Part 3 Nested ESXi pre and post deployment
4. VMware Cloud Foundation 3.9.0 Nested Deployment – Part 4: SDDC Bringup
Once the Network protocols are created and ESXi hosts are commissioned, the next logical step in the VCF 3.0 deployment is to create workload domain.
A workload domain is a policy-based resource container with specific availability and performance attributes and combining vSphere, vSAN, and NSX into a single consumable entity for a specific purpose.
Before you begin, gather the following information for the new workload domain.
- New WLD name
- New Cluster name
- Organization name
- New vCenter IP address, FQDN, subnet mask, gateway, and root user password.
- New NSX manager IP address, FQDN, subnet mask, gateway, NSX Manager Admin password, enable password.
- NSX Controllers IP addresses, FQDN’s, subnet mask, gateway, and NSX Controllers password.
Note that the IP and FQDN must be resolvable (forward & reverse) for every component before you start the deployment. Double check it from the SDDC manager command line and one of the ESXi hosts.
Commission Hosts
Before we can create our first WLD, we need to commission the hosts. This is a process in which the hosts are checked for compliance with VCF and are brought under control of the SDDC Manager.
To be able to commission hosts, we do need a Network Profile. In this network profile, the definition of networks is described. This goes for vMotion and (if applicable) vSAN networks. Normally we would create separate networks for each WLD, but my VLANs are limited, so I chose to use the existing network profile, which was created with the Management Domain (MD).
The existing network profile can be found here:

The pools have been extended so that new hosts can be added to it.
Within the SDDC Manager Dashboard, we get the option to commission hosts. We can choose to commission all hosts in one go:

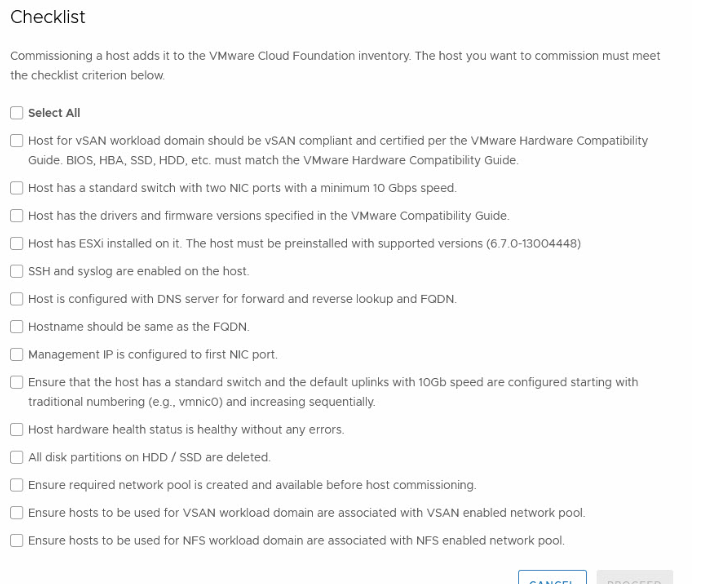
And when we start commissioning hosts, we get the checklist to make sure we thought of everything (which we have ;)):
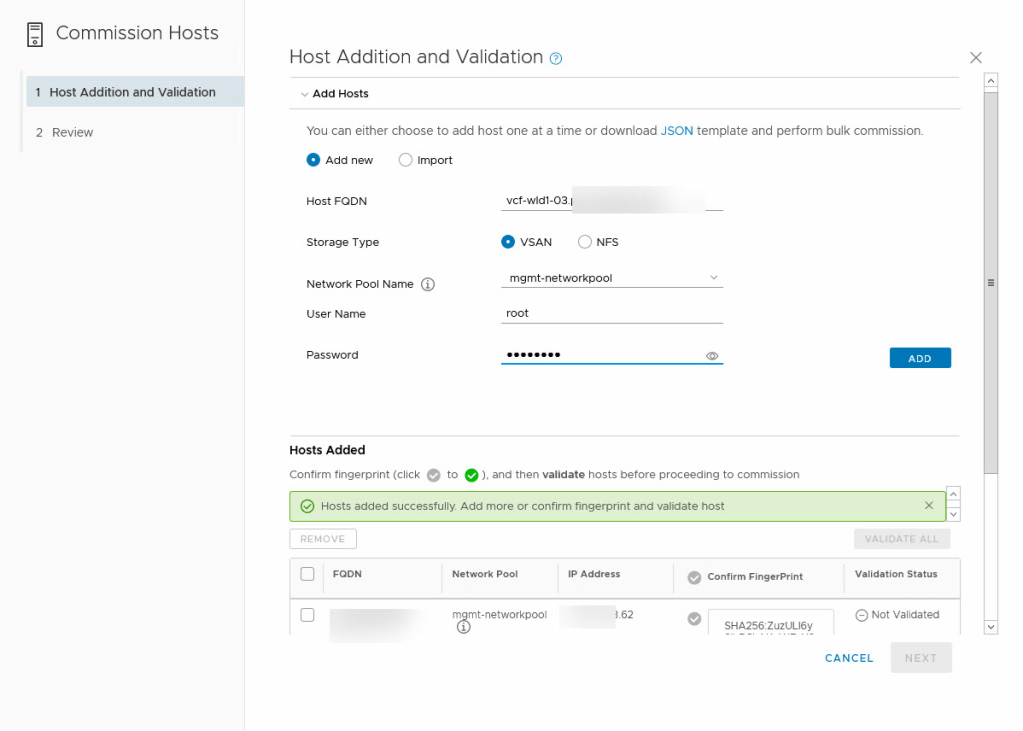
When we check all boxes, we can proceed to the next page, where we can list the hosts we are adding. Here we can add each host individually or create an import file. In our case, I chose to add them manually:
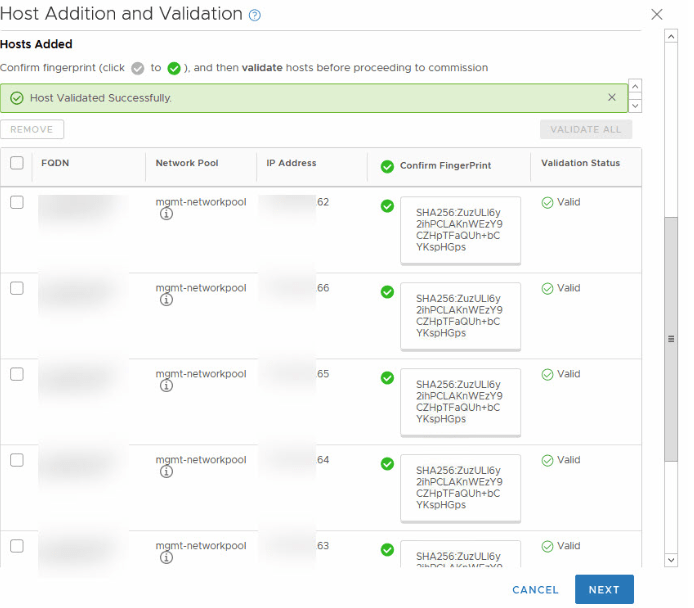
When all hosts are added to the list, we can validate all FingerPrints (by clicking on the checkmark next to “Confirm FingerPrint” and then we can choose to Validate the hosts.
This will validate all hosts and makes sure that you haven’t just signed off on the checklist, without actually doing the necessary work. When the validation has completed successfully, we can go to the next step, which will add the hosts to the SDDC Managers inventory:
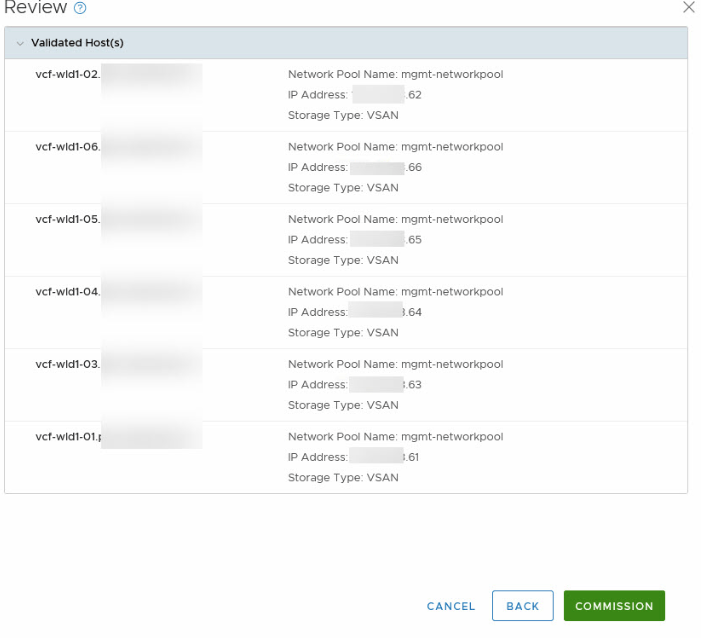
After we hit Next, we can review all information and start the commissioning of the host:
Commissioning a host will trigger a list of tasks that will be performed. It is possible to check the progress as well:
After the commissioning is done, we can see all the hosts available to us in the SDDC Manager:
Now that we have the hosts available, we can start with the creation of our first Workload Domain (WLD). Of course, we also need to make sure that all entities that we are going to deploy, is configured in DNS for forward and reverse lookup.
The following entities need to be created in our situation, where we are utilizing NSX-T):
- vCenter Server
- NSX-T VIP
- NSX-T Manager 1
- NSX-T Manager 2
- NSX-T Manager 3
We select + Workload Domain and choose the type. In our environment, the only option is VI – Virtual Infrastructure. This is because the Horizon bundle has not been downloaded.
We need to choose the type of storage for our new WLD:
We choose vSAN and click Begin. From there we get a couple of screens that ask us a lot of information, like (not to have all screens displayed here, for some I have just listed the questions asked):
Name:
- Virtual Infrastructure Name
- Cluster Name
- Organization Name
Compute:
- vCenter IP Address
- vCenter Name
- vCenter Subnet Mask (prefilled, based on the deployment of the MD)
- vCenter Default Gateway (prefilled, based on the deployment of the MD)
- vCenter Root Password
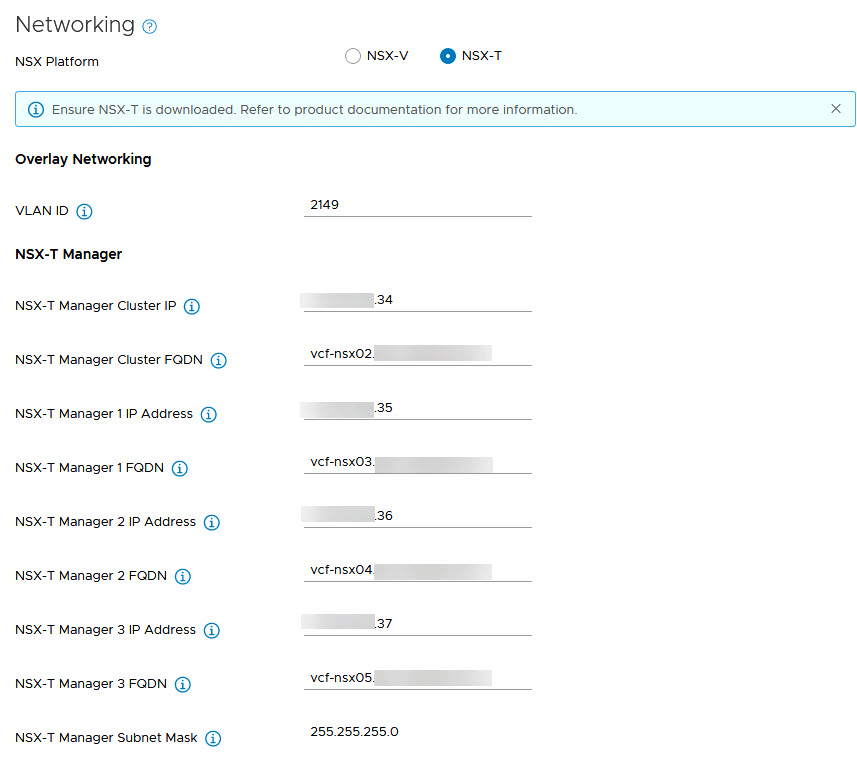
Networking
In networking, we get to choose between NSX-V or NSX-T. When choosing NSX-V, you create one environment for each WLD (because of the connection between the NSX Manager and the vCenter Server). When choosing NSX-T, you create one environment for each WLD that is configured for NSX-T
vSAN Parameters
- Failures to Tolerate (determines the number of hosts required)
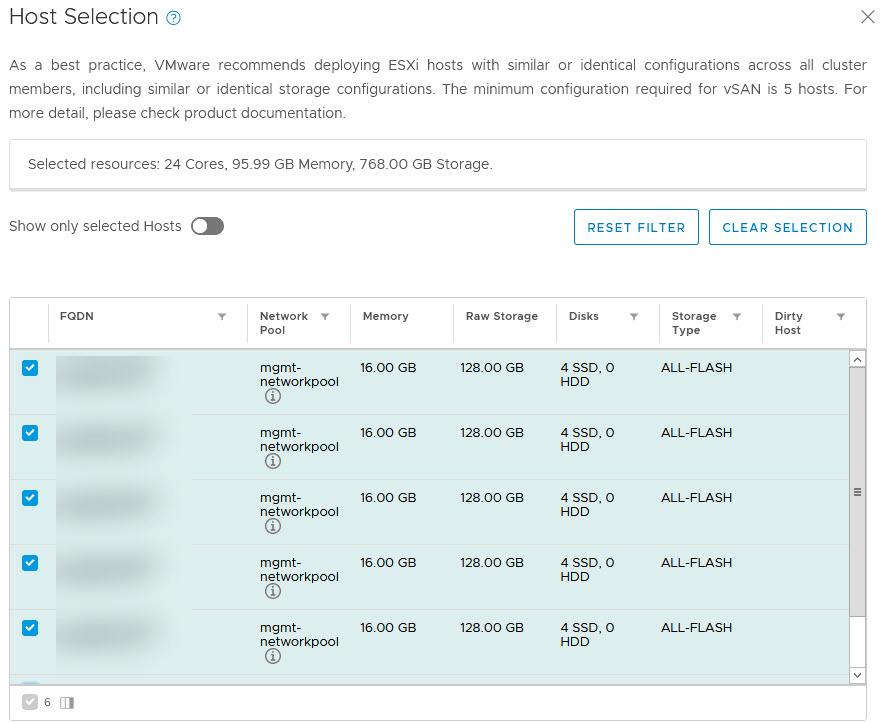
Host Selection
Here we get to choose which hosts will be added to our WLD. It will check how many hosts are selected, to allow for the Failures to Tolerate selected earlier. We selected 5 of our 6 commissioned hosts (so we can extend the cluster for another blog post ;)):
License
A screen to select the necessary licenses for the used products (in our case NSX-T, vSAN, and vSphere)
Object Names
In this screen, all generated names are displayed, which we take at face value.
Review
In this screen all information is shown before we can click Finish:

And after we click Finish, the SDDC Manager is going to create a Workload Domain and all necessary components.
Now, this is a little bit tricky, since we are running nested and with limited resources. It is important to have made sure that all newly deployed components can run. So for NSX-T, VCF will deploy 3 Managers, each with 48 GB of memory (fully reserved) and 12 vCPU’s. So the management hosts should be able to accommodate that.

This process takes approximately 3 hours depending on the number of hosts you have selected. The result is a workload-ready SDDC environment!
