Previous vCF articles from the series:
- Introduction to VMware Cloud Foundation 3.9.1 : Part1
- VMware Cloud Foundation 3.9.0 Nested Deployment – Part 2: Lab Setup
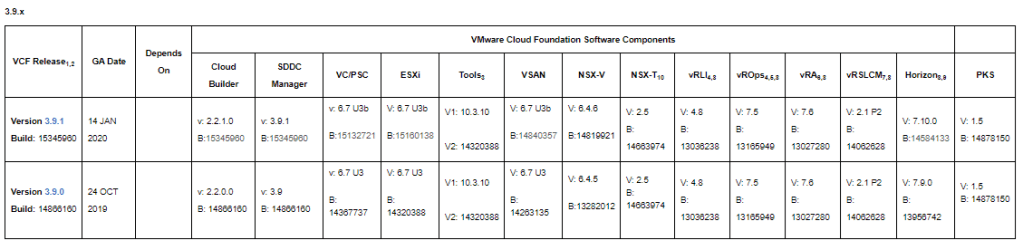
Before we plan to create nested ESXi hosts or physical, we need to identify the build/version of ESXi and other components that are compatible with a given vCF version. You can refer KB article https://kb.vmware.com/s/article/52520
As we are going to deploy vCF 3.9.0 below are the build versions that I have used in my lab for deployment.
Post Installation Tasks
Once Esxi is installed and up, we need to configure following on each host:
1: Management Network configuration: Use static IP for the For Management network.
2: Esxi Hostname: Set hostname of ESXi to FQDN e.g mgmt-esxi01.virtuallyvtrue.com (you can leave the DNS suffix blank).
3: NTP Settings: Specify NTP server and set service start up policy to: start and stop with host.
4: SSH Settings: Enable SSH and set service start up policy to: start and stop with host.
5: Fake SSD disk for vSAN: We need to tag one disk on each host as SSD so that vSAN can be configured during SDDC bring up process.
Run below commands:
esxcli storage nmp satp rule add -s VMW_SATP_LOCAL -d mpx.vmhba1:C0:T1:L0 -o enable_ssd
esxcli storage core claiming reclaim -d mpx.vmhba1:C0:T1:L0
esxcli storage core device list -d mpx.vmhba1:C0:T1:L0
Note: According to your environment and setup adjust mpx.vmhba1 C0:T1:L0 to correct value.
<p value="<amp-fit-text layout="fixed-height" min-font-size="6" max-font-size="72" height="80">This concludes the preparation of the underlying infrastructure for the VMware Cloud Foundation deployment.
Comments are closed.