Introduction
Kubernetes is a system designed to manage applications built within containers across clustered environments. It handles the entire life cycle of a containerized application including deployment and scaling.
In this guide, we’ll demonstrate how to get started by creating a Kubernetes cluster on Ubuntu 20.04. We will be using kubeadm to setup Kubernetes.
Prerequisites:
- One or more machines running Linux operating system like deb/rmp. I’m going to use Ubuntu 20.04
- 2 GB+ of RAM / machine (works with less RAM but, you cannot run later on heavy resource applications).
- Min 2 vCPU for master node (control-plane node).
- Full network connectivity between machines (machines can be in either public network or private network, respectively).
- Swap space must be disabled. You MUST disable swap in order for the kubelet to work properly. To disable swap, hash out the line about swap from the /etc/fstab file. And run sudo swapoff -a
- Letting IP tables see bridged traffic. To perform this, run the below commands on all the three nodes. Also, on the Linux VMs don’t forget to enable IP Forwarding:
cat <<EOF | sudo tee /etc/sysctl.d/k8s.conf
net.bridge.bridge-nf-call-ip6tables = 1
net.bridge.bridge-nf-call-iptables = 1
EOF
sudo sysctl --system
Setup Kubernetes Cluster
All the prerequisites has been taken care, now we need to install the Kube components, network plugin called Calico, and the container runtime. In our case, we will use docker as our container runtime.
The three Kube components that we will be installing are:
- kubeadm
- kubectl
- kubelet
Step 1 – Get each server ready to run Kubernetes
We will start with creating three Ubuntu 20.04 servers. This will give you three servers to configure. To get this three member cluster up and running, you will need to select Ubuntu 20.04, 4GM RAM servers and enable Private Networking.
<p value="<amp-fit-text layout="fixed-height" min-font-size="6" max-font-size="72" height="80">Create 3 hosts and call them kube-01, kube-02 and kube-03. You need to be running hosts with a minimum of 4GB RAM.Set your hostnames for your servers as follows:
| Server | Hostname |
|---|---|
| 1 | kube-01 |
| 2 | kube-02 |
| 3 | kube-03 |
Kubernetes will need to assign specialized roles to each server. We will setup one server to act as the master:
| Hostname | Role |
|---|---|
| kube-01 | Master |
| kube-02 | Node |
| kube-03 | Node |
Step 2 – Set up each server in the cluster to run Kubernetes.
SSH to each of the servers you created. Proceed with executing the following commands as root. You may become the root user by executing sudo -i after SSH-ing to each host.
Install Docker on all nodes (master and worker):
apt-get install docker.io
Check the version of docker by running:
docker -v
On each of the three Ubuntu 20.04 servers run the following commands as root:
sudo apt-get update && sudo apt-get install -y apt-transport-https curl
curl -s https://packages.cloud.google.com/apt/doc/apt-key.gpg | sudo apt-key add -
cat <<EOF | sudo tee /etc/apt/sources.list.d/kubernetes.list
deb https://apt.kubernetes.io/ kubernetes-xenial main
EOF
sudo apt-get update
sudo apt-get install -y kubelet kubeadm kubectl
sudo apt-mark hold kubelet kubeadm kubectl
Step 3 – Setup the Kubernetes master node:
On the kube-01 node run the following command:
kubeadm init --pod-network-cidr 192.168.2.0/24
This can take a minute or two to run, the result will look like this:
To start using your cluster, you need to run the following as a regular user:
mkdir -p $HOME/.kube
sudo cp -i /etc/kubernetes/admin.conf $HOME/.kube/config
sudo chown $(id -u):$(id -g) $HOME/.kube/config
Your Kubernetes master has initialized successfully!
Run the following commands on kube-01:
mkdir -p $HOME/.kube
sudo cp -i /etc/kubernetes/admin.conf $HOME/.kube/config
sudo chown $(id -u):$(id -g) $HOME/.kube/config
Step 4-Installing the Network plugin
There are various network plugins that Kubernetes supports. For the purposes of this series, I will be using Calico.
To install the network plugin, we will make use of our newly installed kubectl.
kubectl apply -f https://docs.projectcalico.org/manifests/calico.yaml
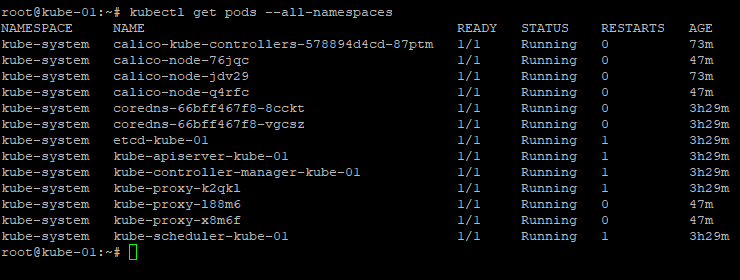
This command will install a bunch of objects which is something we can discuss later. You can make sure that the installation has completed if the below command shows you that all pods are running.
kubectl get pods --all-namespaces
Step 5 – Join your nodes to your Kubernetes cluster
You can now join any number of machines by running the kubeadm join command on each worker node as root. This command will be created for you as displayed in your terminal for you to copy and run.
kubeadm join 192.168.1.161:6443 --token 8zmptv.qtcc6blcbq5n1msv --discovery-token-ca-cert-hash sha256:48386165b4931110c11c9df11906fb388320444fad53688581558c57cf0f312a
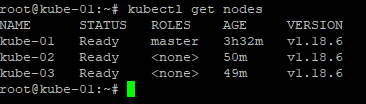
Once the worker nodes are successfully joined to the cluster. You can run the below command to check the status of the nodes in your Kubernetes cluster.
kubectl get nodes
We have created a Kubernetes cluster and learned how to use the Kubernetes command-line tool kubectl.
Happy Learning..!!
